Stitching
When you move one image in the Tiling View workspace so that it is aligned or combined with another image in the Tiling View workspace, this is called 'stitching'. The controls in the Stitching group give you options for combining images or otherwise aligning them in the Tiling View workspace.
The None, Snap to Edge, and Pattern Matching options are mutually exclusive methods for doing stitching operations. With the None option, stitching is done entirely manually. With the Snap to Edge option, Image-Pro guides images to locations that are aligned with the edge of other images. With the Pattern Matching option, Image-Pro provides an automated method of combining images that contain overlapping image data. These options are described in greater detail below.
None: Select this option to turn off the 'snap-to' feature. When the snap-to feature is off, you can click-and-drag images to any position in the Tiling View workspace.
Snap to Edge: Select this stitching method to have Image-Pro snap images to locations that are perfectly aligned with the edges of other images. When this option is selected, whenever you attempt to move an image in the Tiling View workspace, Image-Pro presents a green outline that represents the nearest snap-to location, as follows:
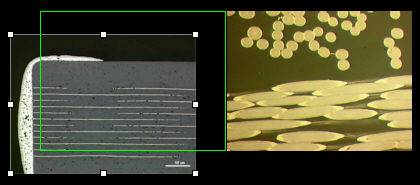
The snap-to location will be determined by current Border, Gap X, and Gap Y values of the Settings tool in the Align group. These values determine the spacing between images and around the outside of the cluster of images.
The Snap to Edge method has, also, an auto-resize option:
-
Auto-Resize: Check this if you want images to be automatically resized when they are stitched to match the size of image to which they are stitched. Using the auto-resize option, you can create a much more uniform composite of images. For example, Figure 1 below represents a composite with Auto-Resize disabled, and Figure 2 represents a composite with it enabled
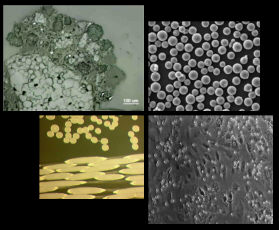
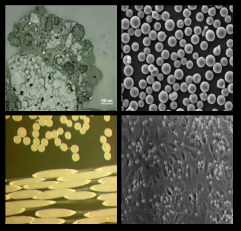
Figure 1 Figure 2Note: The Allow Resize option in the Options group must be enabled to use the Auto-Resize option. Also, if the Keep Aspect Ratio option in the Options group is enabled, the Auto-Resize will be limited to the resizing of only one edge of the image -- the rest of the image will be resized proportionally to the resizing of that edge.
Pattern Matching: The Pattern Matching function provides an 'intelligent' snap-to option. Using this method, you can have Image-Pro analyze the image data on the edges of the images to look for matching pixel data -- Image-Pro then snaps the images together such that similar image data is aligned.
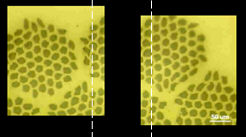
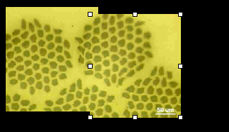
This option is useful for, for example, stitching together a panoramic image from images that represent only a portion of the panorama. In such cases, there is usually some overlapping image data between the images that are to be stitched. For example, the following two images are portions of a panorama; the dashed white line represents the approximate amount of overlap between them.
To use the Pattern Matching option:
Click and drag an image close to (but not on top of) the image to which you want it 'stitched'.
Image-Pro evaluates the edges of the images to look for like-pixel data (see the red shading in Figure 1 below) and, once matching image data has been detected, provides a snap-to box that will force the image to the correct location (Figure 2).
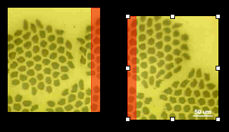

Figure 1 Figure
2
Release the mouse button.
Image-Pro snaps the image to the snap-to box location.
Note: The manual method of using Pattern Matching can also be automated by using the Auto tool (see the description of the Auto tool below).
The following options can be used to tune Image-Pro' pattern-matching routine to work best with the images you are attempting to stitch.
- Correlation Method: This can be either Full or Phase. When Full is selected, both color and luminance information is used to detect matching image data. When Phase is selected, only color information is used. Phase-only correlation ignores image intensity, and may be preferable if the overall image intensities vary while the patterns remain similar.
- Overlap X / Overlap Y: Specifies how much of the images' edges should be evaluated when looking for patterns to align the images. You must enter a value greater than zero for pattern matching to occur. This number must be at least as large as the actual overlapping image data for the Pattern Matching option to function correctly. To ensure this, you should make this number comfortably larger than what you think the overlapping portion of your images is.
- Search Radius (%) parameter, which defines maximum allowed shift from the expected position; the value is the percentage of Overlap. The default value is 50%. If the value is set to 0 – limits are ignored.
- Matching Threshold parameter (range from 0 to 1), which defines the minimum cross-correlation value between tiles that is accepted. If the cross-correlation value below the threshold, the average shifts are used for these tiles. (when the parameter is 0 – any cross correlation is accepted)
- When the Uniform X/Y Overlaps option is checked all tiles use the same average shift, calculated from sampled set of well-correlated tiles. Use this option when many tiles have insufficient texture, this option is also faster. Switch this option off to calculate shifts for every tile individually, it provides more accurate tiling when shifts between tiles varies.
- Multi-point Registration - when this option is on the tiles are aligned by multiple points, when 2 or more anchors detected the tile is registered using elastic deformation to match reference points. When the option is Off, the average shift from multiple points is used, tile is not deformed. This option is recommended to use on samples with variable surface levels, such as SEM images, where tiles may have variable overlaps depending on the height of the surface level.
- Calculate Overlaps - use this button to calculate overlaps based on the current positions of the tiles. Overlap X and Overlap Y will be computed as average overlap between neighboring tiles in rows and columns. Note, that overlaps are also calculated automatically when new images, that have XY position information, are added to the tiling view.
Auto: When you click on this tool, Image-Pro automatically stitches together the images in the Tiling View workspace according the pattern matching method (described above) and the currently-selected pattern matching options.
If it is important that your images are stitched together in a certain order, you can enable the Stitching Order option of the Auto tool accessible from the Auto tool's pull-down menu. If the Stitching Order option is enabled, you will click on the Auto tool twice to complete the auto-stitch operation. The first time you click on the Auto tool, Image-Pro waits for you to tell it which image should be stitched first, which second, and so on. To tell Image-Pro this information, simply click on the images in the order in which you want them stitched. Then, the second time you click on the Auto tool, Image-Pro performs the auto-stitching operation.
Note: Description fields are added to the "info" overlay to show the calculated shifts and the tile order. They can be used to check the correctness of tiling and troubleshooting:
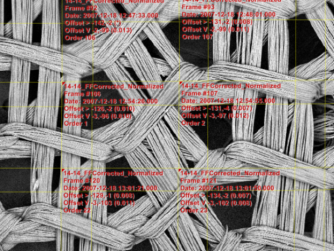
“Offset > X, Y (rank)” – calculated shift of the RIGHT tile in pixels, negative value means overlap. Rank is a cross-correlation rank between 2 tiles (left and right). If the value is shown as (*) it means that the average shift was used for that tile (cross-correlation was either too low or produced result outside the allowed limits, see Search Radius (%) and Matching Threshold.
“Offset V X, Y (rank)” – calculated shift of the tile BELOW the current in pixels.
“Order N” – where N is the order of the tile placement. 1 – is for the first tile, all other tiles are added connected to one of the placed tiles.