Align
The Align group on the Tiling View ribbon allows you to define how images added to the Tiling workspace are to be arranged. The controls on the Align group are described below.
Align Images: The alignment group of tools allows you to define the basic structure for tiling images in the Tiling workspace.
- Cascade: Click this option to cascade images in the Tiling workspace.
- Largest to Smallest: Click this option to arrange images in the Tiling workspace
from largest to smallest. Note
that Image-Pro
will automatically force new rows in order to best fit the images to the
current Tiling workspace dimensions.
- Smallest to Largerst: Click this option to arrange images in the Tiling workspace
from smallest to largest. Note
that Image-Pro
will automatically force new rows in order to best fit the images to the
current Tiling workspace dimensions.
- XYZ: Click this option to arrange images by XYZ position.
- Align by Column: Click this option to arrange images in the Tiling workspace
into aligned columns. Use
the Images in Column spin box
to define the number of images per column.
- Align by Row: Click this option to arrange images in the Tiling workspace into aligned rows. Use the Images in Row spin box to define the number of images per row.
Flip Left-Right: If you have images tiled in rows or columns, you can use this option to reverse the order of images going left to right. If you have images tiled in rows, this option reverses the order of images in each row. If you have images tiled in columns, this option reverses the order of the columns -- that is, the right-most column becomes the left-most column.
Flip Top-Bottom: If you have images tiled in rows or columns, you can use this option to reverse the order of images going top to bottom. If you have images tiled in columns, this option reverses the order of images in each column. If you have images tiled in rows, this option reverses the order of the rows -- that is, the bottom-most row becomes the top-most row.
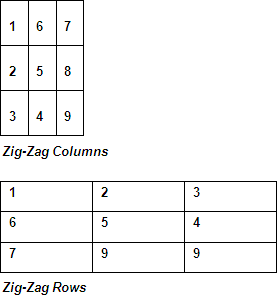
Z-Order: If you have images tiled in rows or columns, you can use this option to arrange them in a zig-zag order, like this:
Images in Column: If you have images tiled in columns, you can use this option to define the number of images per column.
Images in Row: If you have images tiled in rows, you can use this option to define the number if images per row.
Settings: Click this option reveal the following setting options:
- Border: This spin box specifies the pixel-width for the border surrounding the collection of tiled images.
- Gap X: This spin box specifies the pixel-width between images horizontally.
- Gap Y: This spin box specifies the pixel-width between images vertically.
See also: