Calibration
The Calibration group provides tools that allow you to define spatial and intensity calibrations for your images. For example, using a spatial calibration, Image-Pro's pixel-length measurements can be converted to any unit of measurement.
Create
Click the down-arrow below the Create tool to display a drop-down menu of calibration options. The available options are described below.
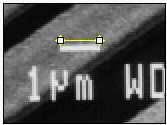
Quick Calibration: You can use this tool to easily create a calibration definition if there is a feature of known length displayed in the image. Simply:
Click the tool button.
Click-and-drag the mouse from one end to the other end of the feature of known length.
The Calibrate by feature dialog box will be displayed.
Use the controls in the dialog box to define the calibration parameters.
- Calibration Name: Enter a name for the calibration. All of the settings defined for the calibration are associated with the name you give it. To apply the calibration to other images, you will be able to select it by name out of a list box of previously defined calibrations.
- Units: Select the units in which the value you enter in the Feature size (units) spin box is expressed. For example, if the feature is 1 millimeter long, select "Millimeter" in the Units list box.
- Feature size (units): Enter the length of the feature of known length. For example, if the feature is 1 millimeter long, select "Millimeter" in the Units list box, and enter "1" in the Feature size (units) spin box.
- System calibration: Check this box to set the calibration definition as the System calibration. The System calibration will be automatically assigned to any new captured image.
- Reference calibration: Check this box if you want the calibration you are defining to be stored as a Reference Calibration.
- Show calibration dialog box: Check this box if you want Image-Pro to display the Spatial Calibration dialog box after the quick-calibration routine is completed. If you think you will need to refine the calibration settings after you quick-create the calibration definition, this option saves you the trouble of clicking the Options tool on the Ribbon.
Click OK to initiate the quick-calibration routine based on the
values you have entered in the other fields.
Auto Calibration: This
tool can be used for calibrating images captured using a stage micrometer.
When you
click on this tool, a dialog box appears prompting you for the calibration
parameters.
- Calibration Name: This field displays the name that will be given to the calibration definition. You can change this name through the Spatial Calibration Options dialog box after it has been created, if desired.
- Units: Select the units in which the value you enter in the Distance between lines (units) is expressed. For example, if the micrometer lines are 1 millimeter apart, select "Millimeter" in the Units list box.
- Distance between lines (units): Enter the distance between the lines of the micrometer, expressed in the whatever value you have selected in the Units list box. For example, if the micrometer lines are 1 millimeter apart, select "Millimeter" in the Units list box, and enter "1" in the Distance between lines (units) spin box.
- System calibration: The System Calibration flag is a flag you can apply to one and only one calibration definition. For example, if you have a calibration definition you want to use as a template for future calibration definitions, you might mark this one as the system calibration definition.
- Reference calibration: Check this box if you want the calibration you are defining to be stored as a Reference Calibration.
- Show calibration dialog box: Check this box if you want Image-Pro to display the Spatial Calibration Options dialog box after the auto-calibration routine is completed. If you think you will need to refine the calibration settings after you auto-create the calibration definition, this option saves you the trouble of clicking the Options tool on the ribbon bar.
- Show reference pattern: The reference pattern is the overlay that is displayed on the image after you click OK in the Auto Calibration dialog box. It can be used to confirm your auto-calibration settings by moving it to match the micrometer marks. You can click Delete to remove it from the image. Alternatively, you can uncheck this checkbox and Image-Pro will not show the pattern at all.
-
OK: Click this button to initiate the auto-calibration routine based on the values you have entered in the other fields. Image-Pro locates the stage micrometer in the image and calculates the calibration.
Note: If the stage micrometer is appears very small in the image, then you may have to draw an ROI around it before clicking the OK button. Image-Pro will use the ROI to find it and use it for the auto-calibration process.
Options
Click the down-arrow below the Options tool to display a drop-down menu of additional calibration display options.
Spatial Calibration Options: Click this option to display the Spatial Calibration Options dialog box in the Details panel of the application workspace. You can use the Spatial Calibration Options dialog box to define, apply, and manage spatial calibrations.
Scale Bar Options: Click this tool to display
the Scale Bar dialog in the Details panel. The options on this dialog box allow you to control the appearance
and placement of scale bars in your images.
Note: Once placed, the length of the scale bar can be adjusted manually by clicking and dragging one of its eight control points. When adjusting the length of the scale bar in this way, the scale value is changed automatically with the length.
Toggle Scale Bar: Click this button to place a scale bar as an overlay in the lower-right corner of the image. The scale bar is a bar labeled with a length value that graphically represents the calibration definition associated with the active image.
Auto Scale: Enable this tool to tell Image-Pro to always automatically place the scale bar in the lower-right corner of all images opened or made active.
Export Lenses and Calibrations: Click this option to save the current set of lens and calibration definitions to a file on your hard drive or to a network location. When you click this option, Image-Pro displays the standard Window Save As dialog box. Navigate to the folder where you want to store the file, provide a name for the file, and click Save. The file can be loaded at a later time using the Import Lenses and Calibrations options (described below).
Import Lenses and Calibrations: Click this option to load a previously-saved *.lcf file containing lens and calibration definitions.
Intensity Calibration: Click this option to display the Intensity Calibration dialog box in the details panel. Click here for more information about defining intensity calibrations and applying them to your images.
Spatial Calibration Options Dialog
The Spatial Calibration Options dialog is displayed in the Details panel when you click the Options tool in the Calibration group. Initially, the dialog appears in its "Basic" view. This view allows you to define, select, edit, and apply calibration definitions.
Apply: Click this button to apply the currently-selected calibration definition appearing in the Calibrations list box to the currently-active image.
New: Click this button to create a new calibration definition. When this button is clicked, Image-Pro creates a new calibration definition with the default name "Spatial Cal" and it activates the calibration fields you can use to define the calibration settings. The values you enter in the group boxes will make up the new calibration definition. You can change the "Spatial Cal" name to something more descriptive by simply typing over this name in the Name field.
Optionally, you can click on the down-arrow to the right of the New tool to access the Calibration from Resolution option. Click From Resolution to have Image-Pro automatically calculate the calibration parameters based on what it knows about the pixel resolution (Dots per Inch, or DPI) of the image.
Open: Click on this tool to open a previously-saved calibration definition or collection of calibration definitions. Click on the down arrow to the right of this tool to show the Save and Save All commands. Use the Save command to save the current calibration to a file. Use the Save All command to save the collection of calibrations appearing in the Calibrations list box to a file.
Delete/Delete All: Use the Delete button to delete the currently-selected calibration definition appearing in the Calibrations list box. Use the Delete All button to delete all calibration definitions appearing in the Calibrations list box.
Scale Bar Options: Click this tool to display the Scale Bar dialog in the Details panel. The options on this dialog box allow you to control the appearance and placement of scale bars in your images.
Reset: Click this button to reset all calibration settings, for the currently-selected calibration definition, to their default values.
Lock Calibration: Click this button to lock/unlock the currently-select calibration. You can use the lock feature to prevent unauthorized changes to the calibration definition.
Calibrations (list box): This pull-down list box lists currently loaded calibration definitions. If the Reference Only button is selected, this list box lists only those calibration definitions that have been tagged as reference calibrations. Otherwise, all currently-loaded calibration definitions are listed.
Reference: Because the list of calibrations can grow quite large over the course of time, it is often difficult to find the more-significant calibration definitions embedded as they are in the large list of all available calibration definitions. For example, the list might contain template calibration definitions in the midst of calibration definitions made from that template, or it might contain a few finalized calibration definitions in the midst of all the interim versions. Image-Pro allows you to mark such calibration definitions as reference calibrations and then limit the list box to listing only reference calibrations. Such a list might hide all but the template or finalized calibration definitions. Click on the Reference tool in the toolbar to mark a calibration definition as a reference calibration.
Reference Only: Click on the Reference Only tool to tell Image-Pro to show only reference calibrations in the Calibrations list box.
System: The System button sets the selected calibration as the System calibration. The System calibration will be automatically assigned to any new captured image.
Name (Units): Select one of the predefined units from the list in the combo box. The list includes the following convertible units: Nanometer, Micrometer, Millimeter, Centimeter, Meter, Kilometer, Inch, Foot, Yard, Mile, Pixel, Other.
Abbr (Units): The short name of the units (as nm, um etc.) will appear when Image-Pro reports spatial data in a report, graph or calibration mark.
X,
Y: Use the X and Y spin boxes to specify the number of pixels that
represent a single unit (or the number of units per pixel, depending on
the radio button you have selected) in both the horizontal (X) and vertical
(Y) directions.
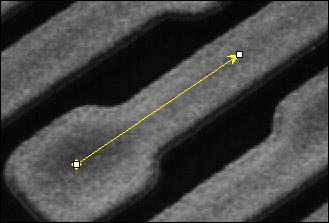
Set unit size from image: This tool can be used to create a calibration definition from an image that contains a reference object of known length. When you select the Set unit size from image button, the Scaling dialog box is presented, and a "defining line" is placed in your image.
In the Scaling dialog box, specify the number of units your reference object represents. If you will be calibrating from an object that is exactly one unit in length, leave the reference value at "1". If it measures anything but 1, you must specify its known length here. Then, you must place the defining line over the length of the object to specify its size in pixels.
Use your mouse to position the defining line over your object. Position the defining line such that it stretches the length of the reference object. Then click OK to return to the Spatial Calibration dialog box.
Image-Pro will calculate the calibration by dividing the number of pixels under the defining line by the unit number you specified in the Scaling box. The result will be placed in both the "X" and "Y" fields of the Pixel's/Unit group box.
Auto Calibrate: This tool can be used for calibrating images captured using a stage micrometer. When you click on this tool, a dialog box appears prompting you for the calibration parameters. Follow the instructions on the dialog box.
Distance between lines (units): Enter the distance between the lines of the micrometer, expressed in whatever value you have selected in the Units list box. For example, if the micrometer lines are 1 millimeter apart, select "Millimeter" in the Units list box, and enter "1" in the Distance between lines (units) spin box.
OK: Click this button to initiate the auto-calibration routine based on the values you have entered in the other fields.
Spatial Calibration Options Dialog (Advanced Options)
In the Advanced Options section of the Spatial Calibration Options dialog box are additional controls that you can use to fine-tune your calibration. The controls in this section are described below.
Conversion factor (in meters): The value in this field specifies how many meters in length one calibrated unit is. If your selection in the "Units" field is one of the metric or standard units, then the Conversion Factor field is greyed out, and it simply reports the conversion factor for the unit you selected. For example, if you select "Meters" in the "Units" field, then the conversion factor is reported as "1"; if you select "Millimeter," then the conversion factor is reported as "0.001"; if you select "Inch", then the conversion factor is reported as 0.0254; and so on. If, however, you have selected "Other" in the "Units" field, then the Conversion factors field is enabled so that you can specify the conversion factor. In this case, you should enter the length, in meters, represented by one of whatever unit you are using.
Aspect Ratio: Use this group box to specify the relationship between the horizontal and vertical axes in your image. The value in this field represents X/Y. It is used to compensate for an image acquired with a camera having an aspect ratio different from that of the displaying device.
You may either enter the value directly into the Aspect Ratio field (by typing the value or selecting it with the s and t buttons), or you can click the Image button to specify the value from an object that is known to be square in your image.
When you select the Image button, the Aspect Ratio message box is presented, and a "defining line" is placed in your image. Use your mouse to position the defining line diagonally over your square object. Position the defining line such that it stretches the diagonal length of the square object, from corner-to-corner. Then click OK to return to the Spatial Calibration dialog box.
Image-Pro will calculate the Aspect Ratio and update the Y value in the Pixel's/Unit group box if necessary.
You may also indirectly specify Aspect Ratio by setting the "Y" value in the Pixels/Unit group box to a value not equal to the "X" value. When "X" and "Y" values are not equal, Image-Pro will automatically calculate and update the Aspect Ratio value.
Origin: Use this group box to specify an offset to the horizontal and/or vertical origin of your image. These values establish what will be considered position 0,0 within your bitmap. For example, if you wanted pixel 10,10 to be considered the upper-left corner of your image, you would enter offset values of 10 in each Origin field. The Origin offset values affect the results produced by the Center-X and Center-Y measurements, which report the "X" and "Y" position of the center of a counted object.
You may either enter the Origin values directly into the "X" and "Y" fields (by typing the values or selecting them with the s and t buttons), or you can click the Image button to specify the values from a point in your image.
When you select the Image button, the Origin Offset message box is presented, and a "cross circle" is placed in your image.

Use your mouse to position the cross hair over the pixel that represents the upper-left corner of the image. Then click OK to return to the Spatial Calibration dialog box. Image-Pro will calculate the "X" and "Y" origin offsets based upon the point you selected.
Both positive and negative values are allowed. Negative "X" values move the origin to the left of the left edge of the image, and Negative "Y" values move the origin up above the top line of the image.
Angle Offset: Use this group box to specify an offset, in degrees to the vertical axis. This value affects the Angle results reported by the Count/Size command, which measures the angle between the vertical axis and the major axis of the measured object. The vertical angle is equal to 0 unless an offset has been specified here. If an ellipse measured 90° from vertical, but an offset of 10 had been specified, Image-Pro would report the measurement as 80.
You may either enter the Angle value directly into the field (by typing it or using the s and t buttons), or you can click the Image button to specify the angle from the image.
When you select the Image button, the Angle Offset message box is presented, and a "defining line" is placed in your image.
Use your mouse to position the defining line along the vertical axis of your image. When the defining line is positioned along your vertical axis, click OK to return to the Spatial Calibration dialog box.
Image-Pro will calculate the vertical offset in degrees and place the result in the Angle field.
When you are satisfied with your Spatial Calibration settings, press the Apply button. This will apply the calibration to the active image.