Display
The options in the Display group of the Adjust ribbon are shortcuts to controls in the Display group of the Advanced Display ribbon. Click here to learn more about these tools and controls. Click on the Advanced tool to display the Advanced Display ribbon.
The Display group provides controls that allow you to improve the visualization of images in the following ways:
- Display Range: Often images are captured such that the actual useful data does not cover very much of the dynamic range of the image. For example, the dynamic range of an 8-bit image is 0-255, but the useful data in an image may cover only a small portion of that range (such as 50-200). The display range controls allow you to set the Black and White levels such that all pixel intensities below the black level display as black and all pixel intensities above the white level display as white. All intensities within the active range are scaled to the 0-255 range. Setting the Black and White levels can be very useful to exclude irrelevant image data and/or boost the contrast between relevant intensities.
- Brightness,
Contrast, and Gamma: These are standard image adjustment controls
that allow you to uniformly increase or decrease the brightness and contrast
in images.
When the Display controls are adjusted, the pixel values in your image bitmap are not actually modified; the controls modify a Lookup Table (LUT) through which your image is interpreted. For example, when you increase brightness in an image, all of the intensity values in your image are increased by a certain amount. The pixel values in your image are not actually changed; the changes you see on the screen are calculated by reading the image's original value and processing it through the Lookup Table.
Image-Pro uses an LUT for processing intensity enhancements because:
- It is the fastest way to apply multiple adjustments to an image, and
- It lets you easily reverse
adjustments you have made.
When contrast modifications are performed, all changes are placed into the LUT. If you were to copy, resize or otherwise perform an operation that produces a new window from your bitmap, the results would be derived from the unenhanced values.
To make the LUT enhancements permanent, you must click the Apply button in the Display group. If an ROI is active when the Apply option is performed, the LUT values will be written to just the pixels within the ROI.
Brief descriptions of the controls in the Display group are provided below. For a more in-depth discussion of the Display options, read also Enhancing Images Using LUTs.
BCG Controls: The Brightness, Contrast and Gamma (BCG) controls are used to adjust the visual qualities of your images. Brief descriptions are provided below. For a more in-depth discussion of these options, read Enhancing Images Using LUTs.
- Brightness: Move this slider up to increase, or down to decrease, the image brightness. A value of 50 represents no change to the image values.
- Contrast: Move this slider up to increase, or down to decrease, the image contrast. A value of 50 represents no change to the image values.
- Gamma: Move this slider up to increase the Gamma value (increase dark area contrast) or down to decrease the Gamma value (increase bright area contrast). A value of 1 represents no change to the image values.
Note: The BGC controls change the appearance of your image as it is interpreted through the Lookup Table. They do not actually change the pixel values in your image bitmap. If you want to apply the changes to your bitmap you must write the values to the bitmap by using the Apply Display to Image button.
BL: Use this spin box to set the black level value to be used for the currently active image. All pixels in the image with a pixel intensity value equal or less than the value specified here will be translated as having a value of zero (black). All other pixels will be decreased proportionally to use the full intensity range. Note that you can also have Image-Pro automatically determine an optimal black level for the image using the Best Fit tool.
WL: Use this spin box to set the white level value to be used for the currently active image. All pixels in the image with a pixel intensity value equal or more than the value specified here will be translated as having the highest value possible for the pixel depth of the active image. All other pixels will be increased proportionally to use the full intensity range. Note that you can also have Image-Pro automatically determine an optimal black level for the image using the Best Fit tool.
Best Fit: Click this tool to have Image-Pro automatically reset the black level and white level in the image according to the currently selected Best Fit option. To review and select options, click on the down arrow to reveal the best fit menu of options. Click here to learn more about the options on this menu.
Apply Display to Image:
Use this
tool to make the current Lookup Table adjustments permanent.
When the Display controls are adjusted, the pixel values in your image
bitmap are not actually modified; the controls modify a Lookup Table (LUT)
through which your image is interpreted. For
example, when you increase brightness in an image, all of the intensity
values in your image are increased by a certain amount. The
pixel values in your image are not actually changed; the changes you see
on the screen are calculated by reading the image's original value and
processing it through the Lookup Table. The
Apply Display to Image tool replaces
the image's original pixel values with the LUT calculated values and deletes
the lookup table.
Reset Display: Click this tool to reset the entire lookup table (display range and contrast enhancement). This action restores the image to its pre-adjusted appearance.
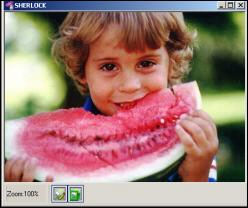
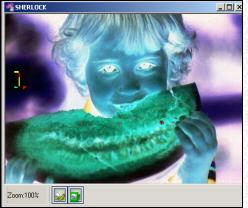
Invert Display: Click this tool to reverse the values in the lookup table for your active image. The example below shows the original image, and the image with the inverted contrast.