Process > Filters > 2D Filters > Morphological
On the Morphological page of the 2D Filters dialog box, the following options are available.
Open: Select this morphological filter if you want to modify the shape of objects in your image. Assuming your image contains bright objects on a dark field, the Open filter will smooth object contours, separate narrowly connected objects, and remove small dark holes.
Close: Select this morphological filter if you want to modify the shape of objects in your image. Assuming your image contains bright objects on a dark field, the Close filter will fill gaps and enlarge protrusions to connect objects that are close together.
Erode: Select this morphological filter if you want to modify the size of objects in your image. The Erode filter erodes the edges of bright objects, and enlarges dark ones.
Dilate: Select this morphological filter if you want to modify the size of objects in your image. The Dilation filter dilates bright objects, and erodes dark ones.
Top Hat: Use this filter to detect and emphasize points, or grains, that are brighter than the background. Available in 3 kernel sizes; click the radio button indicating the kernel size that most closely matches the size of the grains you want to detect.
Well: Use this filter to detect and emphasize points, or grains, that are darker than the background. Available in 3 kernel sizes; click the radio button indicating the kernel size that most closely matches the size of the grains you want to detect.
Branch End: Use this filter to identify morphological branch and endpoints in an image.
Watershed: Select this filter to separate objects that are touching. The Watershed filter erodes objects until they disappear, then dilates them again, but will not allow them to touch. The Watershed filter will not operate upon True Color images. If you want to separate objects in a True Color image, you must first convert it to Gray Scale.
Thinning: Select this filter to reduce an image to its skeleton. When you choose this filter, you must set the threshold that determines whether a pixel is part of the subject, or part of the background (see Options below). The Thinning filter will not operate upon True Color images. If you want to thin a True Color image, you must first convert it to Gray Scale. The following images show the source image and the image resulting from two passes of the Thinning filter.

Pruning: Select this filter to eliminate projecting arms from an object. The following images show the source image and the image resulting from three passes of the Pruning filter.

Distance Map: The distance filter is used for showing the distances of pixels within blobs to the outer boundaries of those blobs. After applying the distance filter, the background will be black (i.e., pixels with value 0). Only the area within the blobs will have non-zero values (will be white). The values of each pixel within the blob will be a count of the shortest distance from that pixel to the edge of the blob. Thus, all pixels along the blob's border will have a value of 1 (since they are one pixel away from the edge of the blob), pixels that are a distance of 2 from the border will have the value 2, and so on. This creates a distance map of the image.
The Distance filter may not operate accurately upon True Color images. If you want to use the Distance filter with a True Color image, you must first convert it to Gray Scale.
Reduce: Select this filter to reduce the objects in an image to a single point or group of points. The Reduce filter will not operate upon True Color images. If you want to use the Reduce filter with a True Color image, you must first convert it to Gray Scale.
Options:The Options group appears differently depending on the filter you select. Refer to the appropriate heading below:
If you selected Distance
If you have selected the Distance filter the options will relate to filter direction and thresholding. The following options will be presented:
- Square: Click this radio button if you want the Reduce or Distance filters applied to the image in a square pattern. Only pixels adjacent horizontally or vertically are included.
- Diagonal: Click this radio button if you want the Reduce or Distance filters slanted across the image. All neighboring pixels, including ones diagonally adjacent, are included.
- Euclidian: Click this radio button if you want the Reduce or Distance filters applied to the image in a larger pattern than either square or diagonal. Filters the image using Euclidian distances and a larger neighborhood that includes the “knight’s move” pixels.
- Threshold (%): Enter a percentage value from 1 - 100 that specifies the intensity value you want Image-Pro to use for binarizing the image. For example, a Threshold of 50% on a Gray Scale image would set all values £ 127 to 0 (black) and all values ³ 128 to the maximum value for that image class (white).
- Threshold
(level): This is the same as Threshold %, but it allows
you to specify the threshold as an absolute grayscale value.
If you selected Erode, Dilate, Open, or Close
If you have selected Erode, Dilate, Open, or Close filters,the options will relate to kernel size and shape. The following options will be presented:
- 2
x 2 Square: Select this button to use the 2 x 2 square
kernel configuration.

- 3
x 1 Row: Select this button to use the 3 x 1 row kernel
configuration.

- 1
x 3 Column: Select this button to use the 1 x 3 column
kernel configuration.

- 3
x 3 Cross: Select this button to use the 3 x 3 cross kernel
configuration.

- 5
x 5 Circle: Select this button to use the 5 x 5 circular
kernel configuration.

- 7
x 7 Circle: Select this button to use the 7 x 7 circular
kernel configuration. This is a two-pass filter, accomplished using
a 5 x 5 circle followed by a 3 x 3 cross.

- 11
x 11 Circle: Select this button to use the 11 x 11 circular
kernel configuration. This is a three-pass filter, accomplished
using a 5 x 5 circle followed by another 5 x 5 circle, followed by a
3 x 3 cross.

- Passes: Select the number of times you want Image-Pro to iterate the filter.
Note: The circular kernels are especially effective on round objects (cells, grains and so on) because their circular configuration preserves the circular shape of your objects better than square configurations.
If you selected Watershed
If you have selected the Watershed filter the options are as follows:
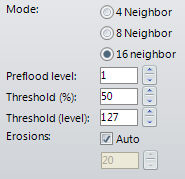
- Mode: The options are:
- 4 Neighbor: Provides 4 Pixels connectivity
- 8 Neighbor: Provides 8 Pixels connectivity
- 16 Neighbor: Provides 16 pixels Connectivity (using Euclidian distance maps to provide a more accurate reduction than binaray morphology).
- Preflood level: The default value of 1 is suitable for most images; values of zero or greater than 3 are rarely useful. The Preflood level is used to dermine how much preflooding of the distance map is done to eliminate the effect of small boundary irregularities in determining local maxima in the distance map. The Preflood level essentially determines how large a boundary 'bubble' needs to be before it is considered a separate object.
- Threshold (%): Enter a percentage value from 1 - 100 that specifies the intensity value you want Image-Pro to use for binarizing the image. For example, a Threshold of 50% on a Gray Scale image would set all values £ 127 to 0 (black) and all values ³ 128 to the maximum value for that image class (white).
- Threshold (level): This is the same as Threshold %, but it allows you to specify the threshold as an absolute grayscale value.
- Erosions: If the Auto checkbox is checked, Image-Pro will continue to iterate until the image has been completely “watershedded”. If it is not checked, Image-Pro iterates as many times as you specify in the spin box below the Auto checkbox. Depending on the filter, successive iterations will strengthen the effect of the filter. Bear in mind that successive passes also require additional time for execution.
If you selected Thinning or Pruning
If you have selected the Thinning or Pruning filter the options will relate to thresholding. The following options will be presented:
- Threshold (%): Enter a percentage value from 1 - 100 that specifies the intensity value you want Image-Pro to use for binarizing the image. For example, a Threshold of 50% on a Gray Scale image would set all values £ 127 to 0 (black) and all values ³ 128 to the maximum value for that image class (white).
- Threshold (level): This is the same as Threshold %, but it allows you to specify the threshold as an absolute grayscale value.
- Passes: If the Auto checkbox is checked, Image-Pro will continue to iterate until the image has been completely “thinned” or “pruned.” If it is not checked, Image-Pro iterates as many times as you specify in the spin box below the Auto checkbox. Depending on the filter, successive iterations will strengthen the effect of the filter. Bear in mind that successive passes also require additional time for execution.
- Retain Long Branches: This option is only relevant to Pruning. If selected, branches longer than the number of iterations will be retained; branches shorter than the number of iterations will be deleted (i.e., "pruned"). Use this option to extract the stem of the skeleton.
If you selected Branch/Endpoints
If you have selected the Branch/Endpoints filter, the options will relate to the number of branches and endpoint that you want the filter to reveal:
- Skeleton will mark all two connectivity pixels with a value of 16. These values allow in-place filtering for all image classes.
- End Points will mark one and zero connectivity pixels with a value of 32.
- Triple Branches will mark all three-connectivity pixels with a value of 64.
- 4+ Branches will mark all pixels with four or more connections with a value of 128. An example of a 4-way branch might be a + or an 5 in a skeleton.
- Threshold (%): Enter a percentage value from 1 - 100 that specifies the intensity value you want Image-Pro to use for binarizing the image. For example, a Threshold of 50% on a Gray Scale image would set all values £ 127 to 0 (black) and all values ³ 128 to the maximum value for that image class (white). This option allows you to apply this function to images that have not yet been skeletonized.
- Threshold
(level): This
is the same as Threshold %, but it allows you to specify the threshold
as an absolute grayscale value.
Note: The results of a branch/endpoint filter will probably be too dark to view. To increase visibility, try increasing the contrast using the Brightness/Contrast tool or applying a pseudocolor map.