Edge
When making manual measurements from one edge of an object to another, locating the object's edges manually is tedious work and, often, subjective as well. The Snap to image feature locates objects' edges automatically and either moves the cursor to the calculated position or snaps the measurement overlay to the calculated position. It provides higher measurement accuracy, reduces subjective error, and makes making measurements easier.
The following snap methods are available:
Snap is off: This disables all snap functionality.
Snap to straight edge: When Snap to straight edge is selected, the closest straight edge is located within the cursor area as defined by the Radius control. The located position is displayed on the image as a cross and line (the line shows the direction of the edge). If the mouse stays still for a short interval, the cursor moves to the calculated position.
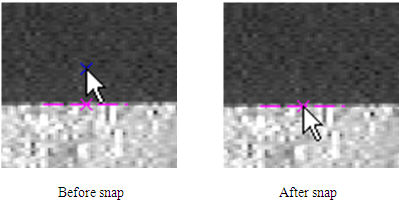
Snap to any edge: The closest edge is located within the cursor area, as defined by the Radius control. This option can be used on small objects or on objects with curved outlines. If the mouse stays still for a short interval the cursor moves to the calculated position. This method is active with all manual measurement tools.
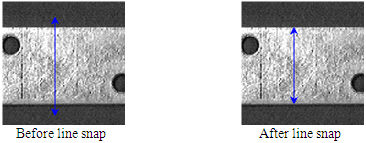
Adjust line length: When Adjust line length is selected, the measurement feature is snapped to the sharpest rising and falling edge underneath the line. This tool can be used when the object is brighter or darker than background and there are no holes or other sharp edges in the middle of the object.
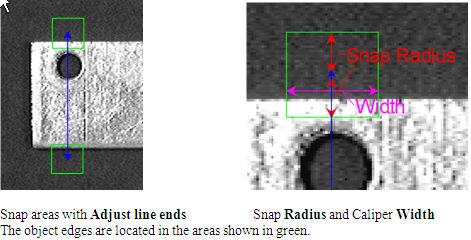
The Width control defines the width of the caliper line, and the Length control defines the match length of the edge detector. This method is active with the Line and Point to Point measurement tools.
Adjust line ends: Adjust line ends can be selected to snap the created line to object edges if inside the object some holes are present or measurements should be done between edges of the same polarity (e.g. between Rising edge and Rising edge). Image-Pro analyses the neighborhood of the line ends as defined by the Radius and Width controls to determine the closest edge to the line ends.
This method is active with the Line and Point to Point measurement tools.
Adjust along edge: The created line is snapped to object edges in the neighborhood of line ends. The area length is defined by the Radius control. The Width control defines the width of the caliper line, and the Length control defines the match length of the edge detector. This method is active with the Line and Point to Point measurement tools.
Find circle: Finds a circle within the specified Radius from the click position. User has to click inside the circular object and the position and radius will be calculated automatically analyzing the object edges in the neighborhood. This method is active with the Circle measurement tool.
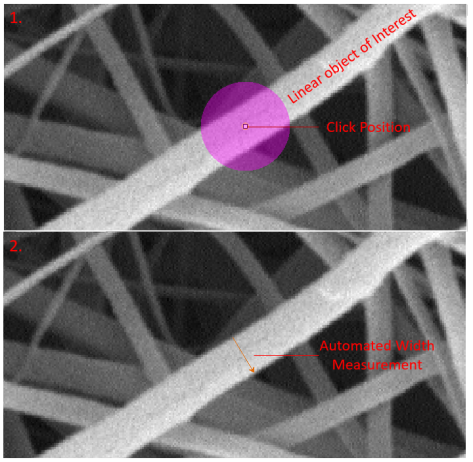
Snap to Line: Detects the width of a linear object that is within the Radius of the click position. You must click inside the object that you wish to measure and ensure that the Radius is large enough to cross both edges of the object.
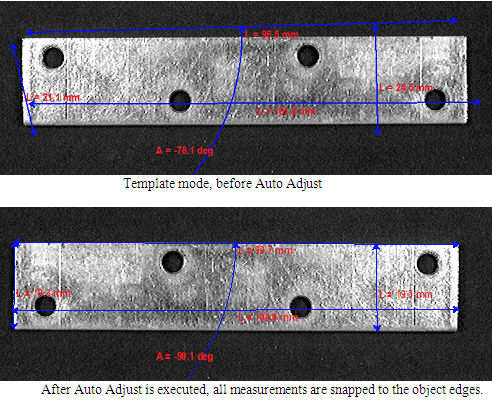
Template and Auto Adjust: The Template tool allows you to create measurement templates. When Template mode is active the Snap functionality is not applied immediately after creating of line features, but only when you click the Auto Adjust tool. Only Adjust line ends, Adjust along edge and Find circle can be used in Template mode.
You can create a number of measurements on
a sample image, save the measurements into a file (Save button in the
Data Table) then Load the measurements on a new similar image and click
the Auto Adjust button [![]() ]: all measurements
features will be automatically snapped to the edges of the image.
]: all measurements
features will be automatically snapped to the edges of the image.
Example: