Reshaping Polygon/Polyline ROIs, Annotations, and Measurements
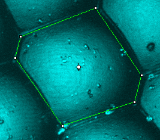
To edit polygon and polyline overlay objects, you work with its control points (also called "nodes" or "vertices"), as you would any other kind of overlay object, such as a square, line, or circle. With polylines and polygons, the configuration of control points may be sparse, as when a polygon is created with individual mouse button clicks, as shown below.
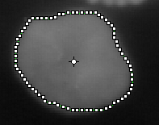
Or they may be close, as when a polygon is sketched with the mouse button held down:
Like other types of graphic objects, all control points can be moved together by grabbing and dragging the object with the hand tool (see Moving an ROI, for example). And the whole object can be rotated by clicking on the rotation handle at the center of the object and dragging it around (see Rotating an ROI for an example of this).
Unlike other types of overlay objects, however, polygons and polylines can be reshaped. To reshape the object, you can insert, delete, or reposition one or more control points.
Image-Pro supports three distinct techniques for reshaping polygons and polylines: single control point adjustments, extended control point adjustment, and nudging.
Single Control Point Adjustments
When there are relatively few control points, it often best to just click and drag individual control points around to reshape your polygon or polyline object. To reposition a control point:
Click and drag the control point from its original location to a new position.
Notice that only the dragged control point moves, all others stay in their existing positions.
Inserting and Deleting control points
Image-Pro allows you to insert and delete control points.
To insert a control point:
Double click on a line segment between two existing control points where you want the new control point added.
A new control point will be added at the location you clicked.
To remove a control point:
Position the cursor near the control point you want to remove and press the Backspace key.
The control point closest to the cursor is removed (Shift-Backspace undoes the removal).
Extended Control Point Adjustments
Use the extended control point technique to move a whole group of connected control points. In this mode, control points adjacent to the one under the cursor are dragged along with it as if they were on a string. This mode is useful when you want to reshape an object that has a lot of control points that are all very close together.
To enable extended control point mode, right-click the mouse in the image window, and click on the Extended Control Point tool in the popup context menu.
To use extended control point mode:
Click on the polygon you want to edit.
Hover over a control point at the center of a group of control points you want to move.
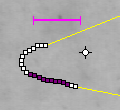
The width of the extension is shown by a colored bar in the upper left of the workspace and by the highlights that show as the cursor is moved over a run of control points, as shown in the figure on the left below.
If you want to extend the grouping less or more, adjust it with your mouse wheel.
Click and drag the center pixel of the grouping to the desired location.
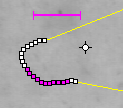
When the mouse button is pressed to drag the central control point, the adjacent control points are shown brighter and they are dragged along proportional to their closeness to the central control point, as if they were on a piece of string.
Press the space bar to exit the extended control point mode.
Note: Holding down the Ctrl key temporarily leaves extended control point mode to allow you to move a single control point if needed or to use the mouse wheel to zoom the image instead of the extension length. But control point insertion (double-click) and deletion (Backspace) work the same as in normal single control point mode, whether the Ctrl key is pressed or not.
Nudging
The nudging technique for reshaping polygons and polylines allows you to push control points around, rather than clicking and dragging them. This technique makes it easy to contour curves in curvy polyforms by 'nudging' the control points into place.
To use nudging mode:
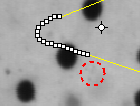
Enable nudging mode by right-clicking the mouse in the image window, and clicking on the Nudge tool in the popup context menu.
Initially the nudge tool will be a dashed circle and has no effect on the selected object:
Use the mouse wheel to adjust the size of the nudge tool.
The size of the nudge tool determines how many controls points it can nudge at one time.
Press the mouse button and move the nudge tool into the control points you want to nudge.
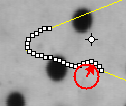
Notice that, when you press the mouse button, the circle becomes solid and shows an arrow tracking the direction of mouse movement, and the nudge follows the direction of the mouse movement:
The nudge tool is designed to operate only at slow speeds. So by moving quickly, you can skip the tool from one side of a polyline to the other or from the exterior to interior of a polygon without needing to let up the mouse button and without disturbing the boundary as it is quickly crossed. This may take some practice to master, but it is often necessary to nudge from both sides of a poly line section to get a boundary placed correctly, so using this technique can speed things up.
Holding down the Ctrl key while editing a polygon or polyline temporarily leaves nudge editing mode to allow you to insert (Ctrl double-click) or move (Ctrl drag) a single control point.
To turn nudge mode off, press the space bar.
Deleting Control Points in Nudge Mode
The nudge tool can also be used to remove control points. Holding down the shift key turns the tool into an eraser tool denoted by an X in the middle, as illustrated in the figures below.
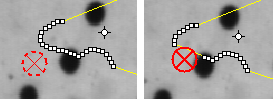
When activated by clicking-and-holding the mouse button, the Shifted nudge eraser tool will remove any control points it touches as it is moved at a slow speed.
Converting Non-Polygon to Polygons
The ability to move control points independently of each other is property of only polygons and polylines. Other closed shapes, such as circles, rectangles, and rounded rectangles-- shapes that are drawn with their respective drawing tools-- do not allow for independent control point adjustments. However, you can convert these other shapes to polygons, if desired.
To convert a non-polygon to a polygon:
Select it in the image window using the Select tool.
Right-click on it to reveal the image context menu.
Click on the Convert to Polygon tool.
The converted object is now a polygon object, and it can be edited with the nudge tool just like any other polygons or polylines.