Regions of Interest
A Region of Interest (ROI) is a closed sub-region of an image. Click here for information on what a region of interest is.
The various tools of the Regions of Interest group are described below.
Select: Clicking the Select button activates the Select tool, which supports all of the normal means of selection (primary mouse button click, shift-click and control-click for multiple selection, net drag for multiple selection). Once selected, ROIs can be moved as a group, copied to the clipboard or be deleted. Double-clicking on the selected ROI brings up the ROI Manager dialog. You can move selected ROIs with the keyboard arrow keys by holding down the <Shift> key and pressing the arrow keys). You can also delete selected ROIs with the <Delete> key. The Select button is only enabled if the current Active Image has at least one ROI region feature (i.e. it is not reset). This button appears highlighted when this tool is active on the Active Image.
Rectangle, Rounded Rectangle, Circle, and Ellipse: These tools allows you to define various closed rectangles and circular ROIs in your images.
Click and drag the mouse
from one corner of the area of interest to the opposite corner.
To force a perfect circle or square, hold down the <Shift> key as
you click and drag the mouse. 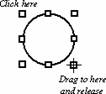
Polygon: This tool allows you define a polygon-shaped or freeform ROI in the image.
To define a freeform: Use this technique to create smooth edges. Hold the left mouse down while you draw with the cursor to create the desired freeform shape. Double-click to complete the shape.
To define a polygon-shaped ROI: Use this technique to create polygons that are made up of straight line segments. Click the left mouse button at each vertex (including the beginning point) of the polygon. Double-click to complete the polygon.
Auto Tracing: The Auto Tracing option allows you to have Image-Pro use its sophisticated edge detection capabilities to auto-detect the boundaries of features in your image and trace them with an ROI. When you select this tool, the following Auto Tracing dialog box is displayed in the Details panel.
- Tracing Speed: This slider controls how quickly traces are snapped to feature edges. Valid values are from zero (tracing steps are made very slowly -- about one step every 1 or 2 seconds) to 100 (tracing steps are completed as fast as possible).
- Edge Quality: Use this control to specify the edge quality that is required for the tracing tool to continue tracing. Allowed values are from 1 to 100. Values above 80 require very sharp edges to track, while values below 10 will follow mere wisps. Set the level higher to get tracing to stop sooner when it goes off track.
- Noise Reduction: Use this control to specify the degree of smoothing to be applied to the image data before edge detection. The higher the number, the greater the noise reduction.
- Momentum: Use this control to specify the degree to which tracing is given forward "momentum." The effect is to help graces from taking off on side-branches, but at the cost of continuing going straight longer when edges change direction. Best used when tracing objects with straight edges.
- Smoothing: Use this control to specify the degree of smoothing to be applied to the final polyline or polygon. Values can be in the range from 0 to 15 and specify the size of an averaging kernel used for the trace smoothing.
- Auto Start Tracing: When this option is selected, the second mouse click made when creating a polyline or polygon will automatically start tracing in the given direction. If this option is not selected, then tracing is initiated by holding down the Ctrl key and clicking in the desired starting direction. The lighting bolt cursor shows when traciing will start.
- Auto Accept Final Trace: When this option is selected, when a trace is completed due to returning to the starting point or by intersecting itself, then the polyline or polygon being created is automatically finalized. If not selected, the user must press the Enter key or double-click the mouse to place the final point and complete the polygon.
- Trim Leading Points: Frequently a trace will not return exactly to its starting point, but rather will intersect itself some distance from the starting point. When the Trim Leading Points option is selected, the line segment from the starting point to the intersection point is removed when the trace is finalized.
- Remove Redundant Points: If this option is selected, horizontal, vertical, and diagonal runs will be replaced by their end vertices when the trace is finalized. If not selected, all result points are retained.
- Monochrome Interpretation: When this option is selected, image color is ignored for edge detection; only average luminance is used. When this option is not selected, each color channel's luminance gradient is considered when doing edge detection.
- Assume Clockwise: If this option is selected, Image-Pro assumes that polygons will be traced in a clockwise direction around the interior of the polygon. This information is used to determine which side of the trace should be considered the interior. Use this option for color images where the traced feature is of one color buried in a multicolor background. When the option is clear, no assumption is made about the interior color. This works well where the background color is uniform.
- Use Rangemin/RangeMax: When this option is selected, the range for full-scale luminance swings is assumed to be the full RangeMin/RangeMax of the image type. When this option is not selected, the range for full-scale luminance swings is assumed to be the displayed range of image luminance.
- Disable
Tracing: Select
this option to disable the tracing feature.
ROI by Numbers: This tool allows you to define a 'standard' rectangular ROI and instantly place it in your an image.
When you click on the arrow to the right of this tool, the ROI by Numbers dialog box appears. Use the Top and Left spin boxes to define the location in the image where you want the top left point of the rectangular ROI placed. Use the Width and Height spin boxes to define the size of the rectangular ROI. Click the 10/20 button to place an ROI of the defined size in the image.
By default, the values you specify in the spin boxes are pixel values. If there is an active calibration definition associated with the image, however, then the In Calibrated Units option is enabled; if you select this option, then the spin box values are interpreted by Image-Pro to be in calibrated units.
Multiple: Selecting or clearing the Multiple tool determines whether a new ROI replaces the existing ROI (when not selected) or is added to the image as an additional ROI (when selected). When the multiple ROIs feature is selected, only system resources will limit the number of ROIs. This button appears highlighted when the option is selected.
Options: Click on Options to show the following additional ROI tools.
- Invert ROIs: Click this button to have Image-Pro treat the region(s) of interest in the active image as those regions that are outside of the defined ROI(s). If this tool is selected, the Cut, Copy, and Crop tools — and all other tools that act upon ROIs — will act upon the regions of the image that are not bound by any ROIs.
- XOR ROIs: Click this button to have Image-Pro treat overlapping portions of ROIs as non-ROIs.
- Move Forward: Click on this option to move the display of the selected object(s) forward in the stack of objects in the same layer. This command moves the selected object(s) on top of the next one(s) in the layer.
- Move Backward: Click on this option to move the display of the selected object(s) back in the stack of objects in the same layer. This command moves the selected object(s) on under the previous one(s) in the layer.
- Merge ROIs: This option is enabled if you have selected two or more ROIs that are overlapping:

Click this option to merge the overlapping ROIs to create a single ROI:
- ROI Mask: Click on this option to apply or clear the ROI mask. The ROI mask is a translucent shaded overlay that covers all areas that not regions of interest in the image.
Cut: The Cut button will copy the contents of the selected ROI to the Window Clipboard and replace the ROI in the image with black. If no ROI is active, Image-Pro cuts the entire active image to the Clipboard and replaces it with black. The Cut command changes the contents of the image in the active window (i.e., Cut Image deletes the cut pixels).
The data copied to the Clipboard can be pasted into the active window or into another open window using the Paste option. You can also create a new window directly from the clipboard contents using the Paste New option.
The keyboard shortcut to the Cut command is <CTRL-X>.
Copy: The Copy button will copy the contents of the selected ROI to the Window Clipboard. If no ROI is active, Image-Pro copies the entire active image to the Clipboard.
Copy will not change the contents of the image in the active window (i.e., copy does not delete the copied pixels). Any data already existing on the clipboard will be replaced.
The copied data can be pasted into the active window or into another open window using the Paste option. You can also create a new window directly from the Clipboard contents using the Paste New option.
The keyboard shortcut to the Cut command is <CTRL-C>.
Paste: The Paste button will paste whatever is in the Windows clipboard to the active image.
Click on the arrow next to the Paste tool to access the Paste New command.
Click this command to paste the current contents of the clipboard into a new image window in the Image-Pro workspace.
Delete: The Delete button will permanently delete the selected ROI(s) from the image.
Delete All: The Delete All button will permanently remove all ROIs from the active image.
See also: