3D View > Decoration
Image-Pro with 3D Module only
The Decoration group contains controls that affect volume visualization in the 3D Viewer. The controls of this group are described below.
Show Axes: The Show Axes tool hides or shows the volume axes. This option display axes that show the orientation of the volume (Red for the X axis, Green for the Y axis, Blue for the Z axis). The origin of the axes is at the 0, 0, 0 location. Deselect this option to hide the XYZ axes.
Show Small Axes: The Show Small Axes tool hides or shows a pair of small axes in the bottom left corner of the view. Show small axes is the default selection. Deselect this option to hide the small XYZ axes.
Show/Hide Bounding Box: Select this option to show the bounding box for the volume in the 3D Viewer window. Deselect this option to hide the bounding box.
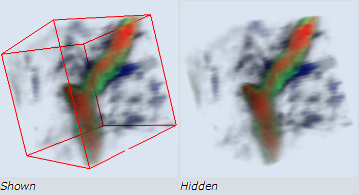
Clicking the drop-down arrow lets you choose between the volume frame and bounding box views and also allows you to select from the following options:
- Show Grid superimposes a grid on top of the image.
- Show Labels displays the volume labels around the outside of the image.
- Font scale determines the size of the labels.
- Tick Frequency controls the placement of tick marks.
Show/Hide Scale Bar: Select this option to show the scale bar for the volume. It will appear in the lower right corner of the 3D Viewer window. Deselect this option to hide the scale bar. Note that the scale bar shows the size in the central part of the volume. In Perspective projection view, the parts of the volume closest to the viewer will look bigger; those that are further away will appear smaller. Switch the projection type to Orthogonal to estimated the size for the whole volume.
View All: Sets the camera distance to view the entire scene.
Stereo: This tools allows you to format the volume for viewing with 3D glasses. When you click this tool, the Stereo Preferences dialog box appears.
Check the Use Stereo check box to enable the stereo mode. Select the desired stereo format from the list box. You can adjust the stereo view using the controls in the Stereo Adjustment group. The Zero parallax balance and Camera offset options work together to adjust the degree of separation between the two colors of the stereo mode. This optimizes the image for viewing at a particular distance on a particular size monitor.
Settings: Click this tool to open a menu of additional viewing options. Click on Functions to show the following options:
- Home: Click this button to instantly restore the view of the volume in the 3D Viewer window to its 'home' position. The 'home' position can be set by using the Set Home option (described below).
- Set Home: This option allows you to set the 'home' position of the view of the volume in the 3D Viewer window. Use the mouse and zoom options to set the view of the volume to a position that you will want to return to again and again in the future, then click on the Set Home command. You can instantly restore the view to the 'home' position, in the future, by clicking the Home command (described above).
- View All: Click this button to instantly adjust the zoom to fit the entire volume to the current window size.
- Seek: Use the Seek feature to focus on a particular part of the volume in the 3D Viewer. When you click on this option, the Seek cursor is displayed. Simple use the Seek cursor to click on a specific location of interest on the volume. Image-Pro will zoom in on that location and make it centered in the 3D Viewer.
Click on Draw Style to show a sub-menu of options that allow you to configure the way objects are drawn in the 3D View window. There are three groups of controls. Select from the top-most group of controls to define how you want volumes to appear in the 3D Viewer when they are stationary. Select from the middle set of controls to define how you want volumes to appear in the 3D Viewer when they are moving (for example, when you are clicking and dragging them to change the camera view). Use the bottom set of controls to increase or decrease the buffering; increasing the buffering uses more system resources, but improves the performance of the drawing of the volume
Click on Headlight to turn on the headlight lighting that causes the Iso-surface to reveal its contours.
Click on Preferences to show the following additional options:
- Spin animation: Select this option to enable the spin animation feature. When enabled, you can effect a spin animation of the volume by a quick click-and-drag motion with the mouse over the volume in the direction you want it to spin. To make the volume spin, click-and-hold the lift mouse button, move the cursor rapidly over the volume and, while still in motion, release the mouse button.
- Anti-aliasing: Select this option to enable anti-aliasing on the volume. This can improve the quality of the edges in the volume.