Classify
The controls of the Classify group allow you to classify objects by single or multiple measurements and define the colors of the classification palette.
Single: Use the Single tool in the Classify group to quickly and easily classify objects by a single measurements. When you click the Single tool, the Classify by Measurement dialog box is displayed.
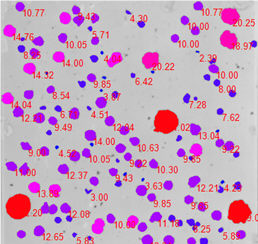
In the top-most combo, specify the single measurement by which you want to classify objects. For example, you could select "Region:Diameter, Mean" in order to classify your objects based on their diameter. The Bins spin box specifies the number of classification bins you want to configure. The Bin ranges (starts) table contains the list of start positions of every classification bin. By default the range is based on the current values for that measurement in the image, and the bin divisions are spread evenly.
Note that there is always one more row in the Bin ranges (starts) table than the number of bins specified in the Bins spin box. This is because the last row specifies the end value of the last bin.
So that you can define the range manually when needed, the start values -- and the end value -- are editable.
If desired, you can also type in only the
first and the last values of the desired range and then click the Spread
![]() button to divide the range evenly by bins.
button to divide the range evenly by bins.
The ranges can be reset using the Reset button. The ranges can be divided linearly or using a logarithmic scale base on the state of the Log button. Note, that logarithmic scale can be used only when the min and max range values are greater than zero.
Clicking the Ok button assigns the classes to the objects in you image according to the bin ranges.
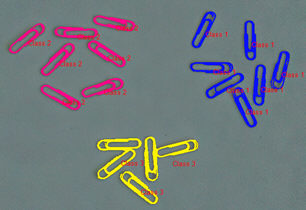
Learning: This tool allows you to use reference objects to 'teach' Image-Pro how to classify other objects. When you click on this tool, the LearningClassification dialog box is displayed. Use the controls in the upper-most panel to define the classes you want to use for classification. For example, if you wanted to classify objects by large, medium, and small, you would add three classes to the panel and select reference objects to represent the ideals of large, medium, and small objects in the image. Click here for instructions.
The lower panel lists all of the measurements that have been selected through the Types tool of the Measurements group. Put a check next to each measurement that you want to be used for the purposes of classification. Click here for more information.
Use the Calculate classifiers tool to have Image-Pro analyze your reference objects according to the classifiers (measurements) you have selected in order to determines optimal weight values to apply to the classifiers in order to achieve maximal differentiation between the classes.
Auto: Multi-measurement auto classification can be applied using the Auto button in the Classify group. The Auto button opens the Auto Classification dialog box. In this dialog box, the Number of Classes spin box defines the maximum number of groups that Image-Pro will attempt to create by auto-classification. The list of Classifiers include all selected measurements of numerical type.
You can use any number of measurements for
classification purposes. Simply put a check in the box beside each measurement
you want to use. All
measurements can be selected/deselected by clicking the column header
![]() button.
button.
Click the Ok button to apply the auto-classification routine. The routine applies hierarchical clustering to the objects in the image using the selected measurements. It assigns classes based on the clusters created by cutting the clustering tree where the number of branches correspond to the number of requested classes.
The following example shows automatic clustering of objects based on their X and Y position.
Colors: The colors used for Count/Size classification can be defined in the drop-down menu of the Colors button. The two color pickers define the color range of the palette. The Spins spin box defines the number of iterations of the palette in the HSI color space on the way from the start color to the end color.