Using the Local Zoom Tool
The Local Zoom feature provides a tool to show a zoomed area of an image in a separate window with a given zoom factor. The zoomed area in the Local Zoom window shows the area around the current cursor location. This makes placing accurate manual measurements very easy, even on big images.
To use the Local Zoom tool:
Click the Image tab from the Image-Pro menu bar.
The Zoom group is displayed.
Click
on the Local Zoom tool.
The Local Zoom dialog is displayed in the Details panel.
In
the Local Zoom dialog, click on the Zoom
pull-down list box and select the zoom factor you want to use.
Click
and drag the left and bottom boundaries of the Local Zoom viewing pane
to adjust it to the desired size.
In the application workspace, mouse over the area of the image that you want to see enlarged.
Wherever you point the mouse cursor in the active image, that region will
appear enlarged by the specified zoom factor in the Local Zoom dialog.
Using the Enhanced Zoom Options
Optionally, in step 3 above, you can select one of the enhanced zoom options:

When you select one of these options, the Local Zoom display is presented in a bitmap analysis formatted:
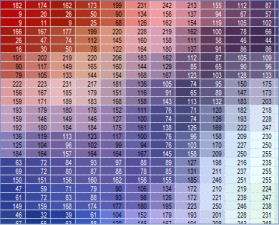
In this display format, for color images, each pixel is represented by three stacked rectangles that show the Red, Green, and Blue channel values, from top to bottom, respectively. For example, the top left pixel in the example 8-bit color image shown above is a mostly red pixel where Red=182, Green=9, and Blue=9.
Learn more about all features in The Image Tab.