Troubleshooting Prediction
Note: Segmentation using Deep Learning requires the Deep Learning extension to the 2D Automated Analysis module. The Image-Pro Neural Engine must be installed. Installing the Image-Pro Neural Engine
Cellpose Models
If you fail to find the expected number of objects when making a Cellpose prediction, there are several adjustments that can be made to improve the prediction in Step 4 of the AI Deep Learning Prediction panel - Set Model Options.
Channel Selection
Both a Segmentation and an Optional Channel can be set in the Select Targets section of the AI Deep Learning Prediction panel. In many cases, highly accurate segmentation can be generated without setting the Optional Channel. In cases where the model was trained with an optional second channel, and where your data set contains this second channel, you can greatly improve the segmentation by correctly selecting the second Optional Channel. The Fluorescent Cells model was trained with the segmentation channel set to the channel with the cytoplasm label, and the second Optional Channel set to the channel with the nuclear label.
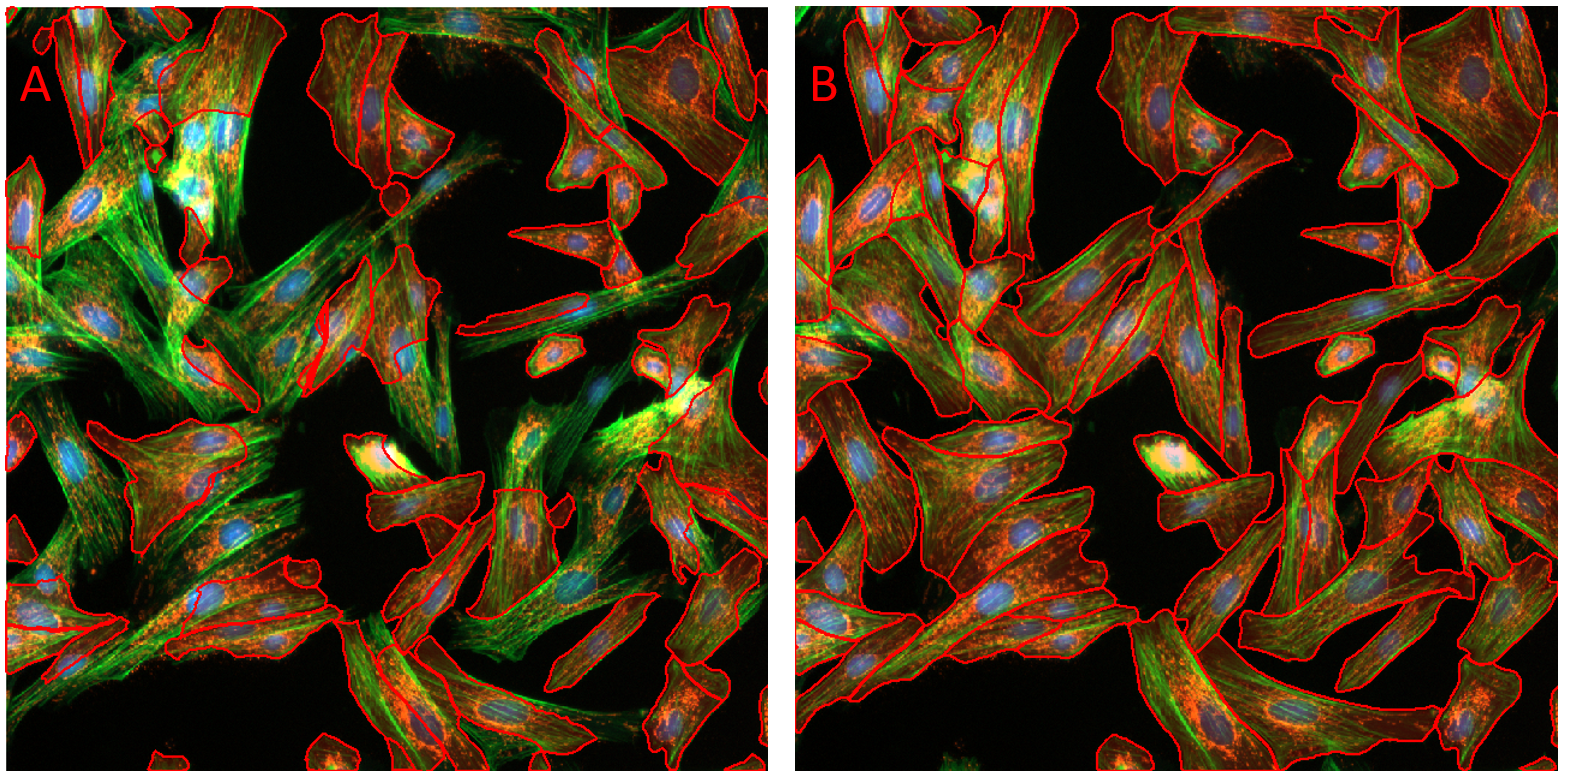
Figure showing a composite fluorescence image of bovine pulmonary epithelial cells. Objects were segmented using the Fluorescent Cells model using default setting. In panel A no Optional Channel was set. In panel B the channel containing the nucleus label was set as the Optional Channel. Note the great improvement in segmentation with correct Optional Channel set.
Object Diameter
Accurate prediction by CellPose models is highly dependent on the accuracy of the Object Diameter setting.
Note: If your image is calibrated, the Object Diameter is shown in calibrated units, the diameter is shown in pixels for uncalibrated images.
If supported by your model, clicking Estimate will automatically populate this field. You should always check, and if necessary edit estimated Object Diameter settings.
Note: If your model does not support the Estimate function, the option is not shown and is replaced with the Default check box. When selected the Object Diameter is set to the mean diameter of objects in the model's training data. You must deselect the default check box and edit the Object Diameter if the default value does not accurately reflect the diameter of your objects of interest.
Select the Size Guide Display Visible check box to display a graphical representation of Object Diameter on the active image.
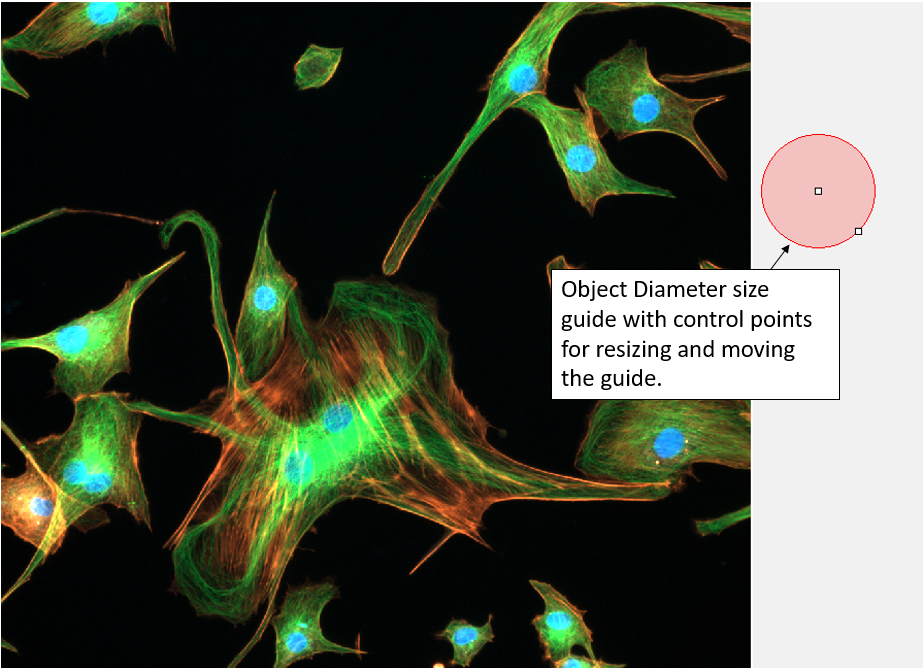
You can change the Object Diameter setting by clicking on the size guide and dragging the control points. You can also use the control points to move the guide around the active image, or to the side of the active image.
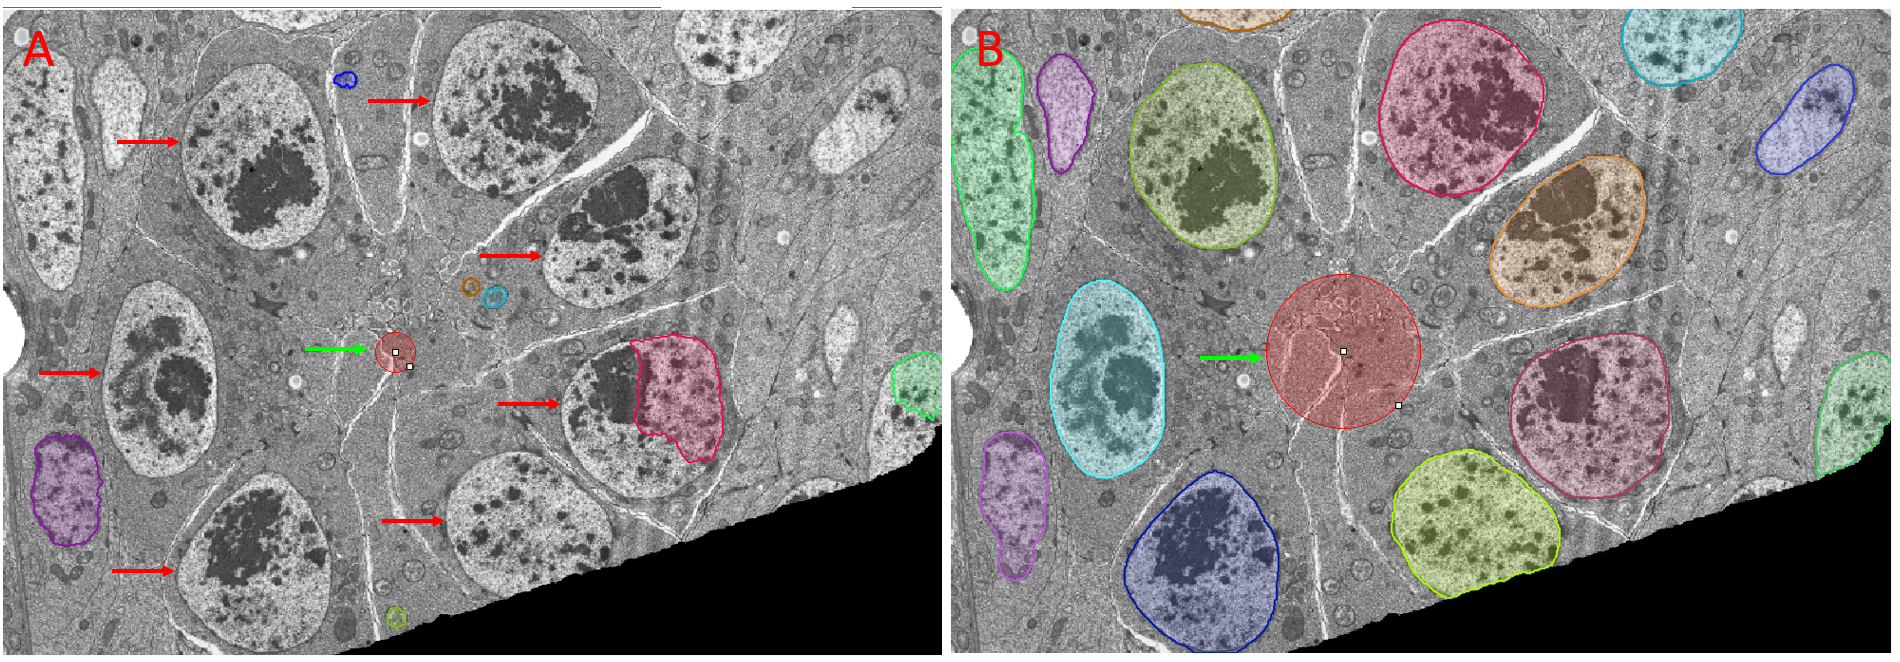
Figure of images after Prediction with a CellPose model showing the effect of the Object Diameter setting. Panel A: Objects of interest (against which the model was trained) are highlighted with red arrows. The size guide representing the Object Diameter used for prediction is highlighted by the green arrow. The failure to correctly set Object Diameter results in failure to predict the objects of interest. Panel B: The Object Diameter was set by clicking on the size guide (green arrow) and dragging the control points until the guide was within the size range of the objects of interest. All objects of interest were accurately predicted after correctly setting Object Diameter.
Strictness
The strictness setting allows you to filter objects according to the likelihood that they are genuine. Reducing this setting increases the number of objects predicted, but increases the risk that some objects will be incorrect. Increasing this setting decreases the number of objects predicted, but increases the likelihood that predicted objects will be correct. Setting the strictness to 0 results in no filter being applied and the maximum number of objects being predicted.
Note: For users familiar with Cellpose documentation, Strictness is an implementation of the Flow Threshold setting. Flow Threshold is applied as 100 - Strictness. Cellpose Settings
Probability Threshold
The probability that every pixel in the image is part of an object is predicted by the CellPose model. Pixels with a probability above this threshold are used to determine objects. You generate more or larger objects by reducing the probability threshold, and fewer or smaller objects by increasing the threshold.
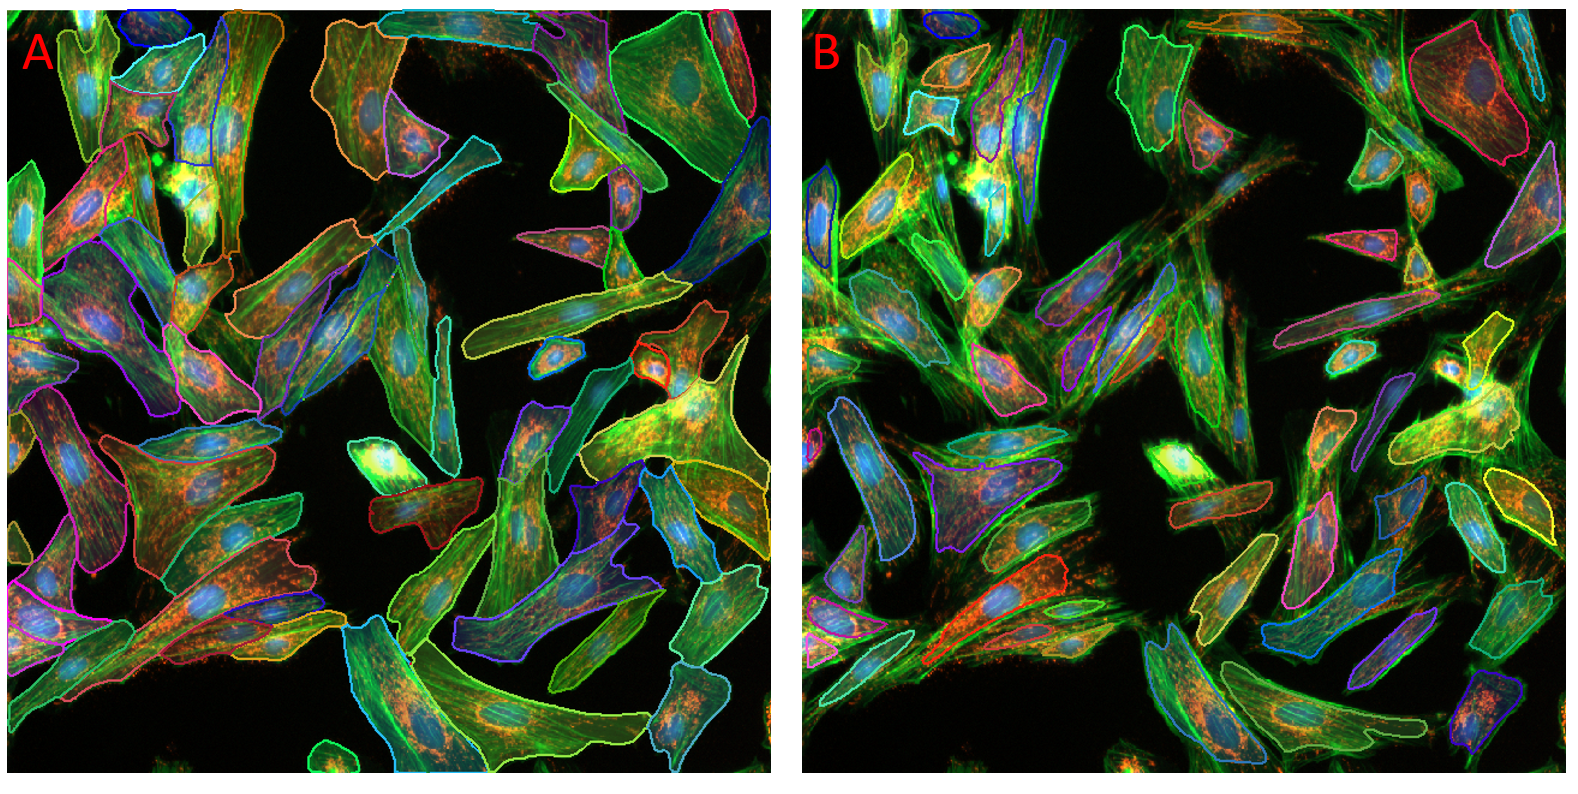
Figure showing a composite fluorescence image of bovine pulmonary epithelial cells. Cells were found using the Fluorescent Cells model. In panel A the default probability threshold of 60% was applied. In panel B the probability threshold was increased to 90%. Fewer and smaller objects are found in panel B.
Sparse Mode
By default this setting is off. When sparse mode is off a new image for analysis is calculated in which the data is normalized in which the 1st percentile of image intensity is set to 0.0 and the 99th percentile of image intensities is set to 1.0 in each channel.
In cases where the ratio of objects to background is very low, and an unexpectedly low number of objects are found, sparse mode should be enabled. With spare mode enabled, the prediction is done using the Image's current display range.
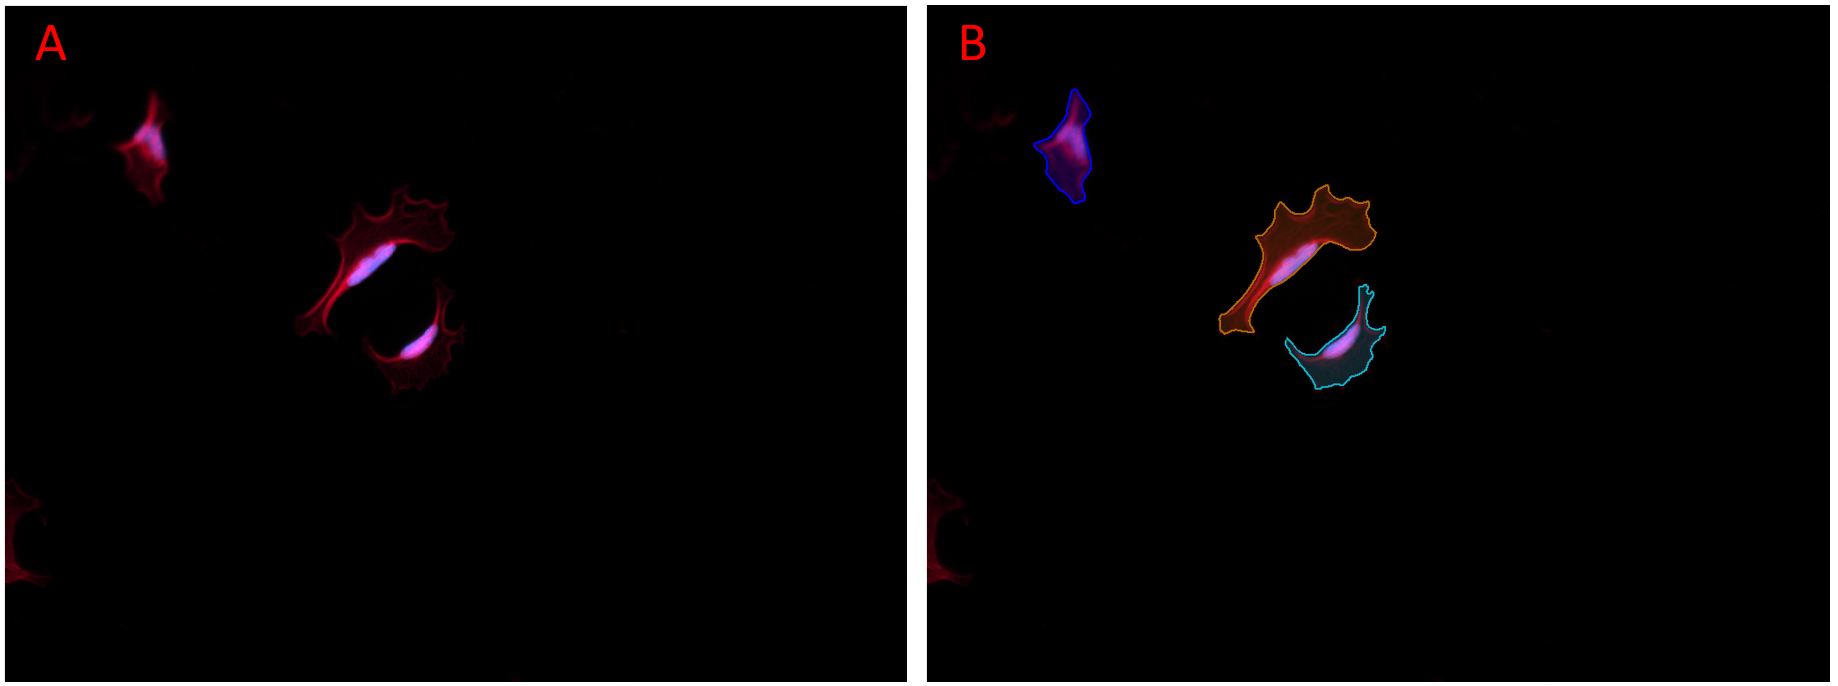
Figure showing an image with a low ratio of objects to background that benefits from Sparse Mode. In Panel A, prediction was done with Sparse Mode disabled, no objects were found. In Panel B, Sparse Mode was enabled and all objects in the image were found. All other settings were identical.
Image Areas in a Different Intensity Range
Inclusion of areas of images in a different intensity range to both the objects of interest and the background can degrade Cellpose predictions. Such areas can affect the normalization of the data (which Cellpose does in the background) in a way that makes target objects less visible to the model. When possible such areas should be excluded using a region of interest.
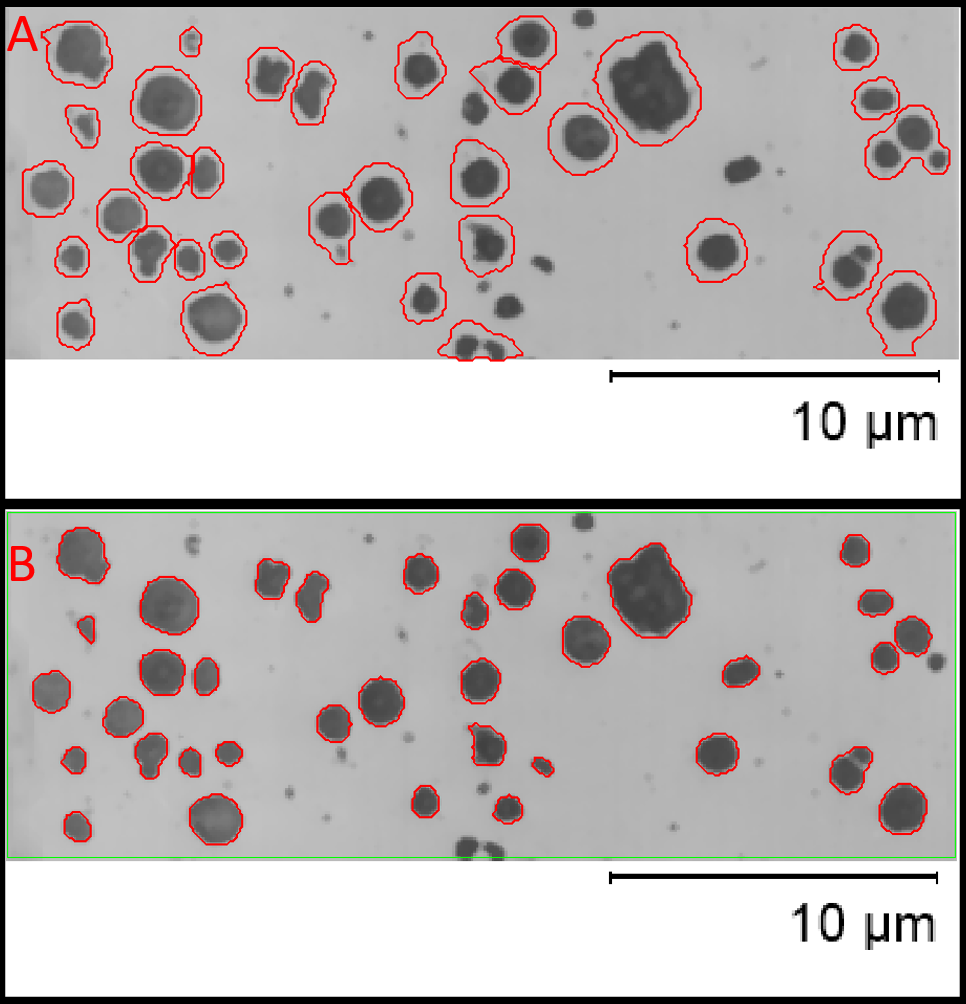
Figure illustrating the effect of image areas in a different intensity range to the area of interest, in this case an information area with a scale bar in which pixels are set to the maximum gray level of the image. In Panel A this area in included in the prediction, note the poor segmentation of objects, failure to discriminate pairs and failure to segment some objects. This area is excluded from the segmentation with a region of interest (green) in panel B, this generates greatly improved accuracy.
What if you still can't segment your objects of interest?
If your objects of interest are not predicted after adjustment of all of the available parameters, you should attempt to train a new model, or extend a model by training with your objects of interest. Image-Pro AI models are locked and can not be trained, so must be cloned before they can be extended with further training.
Cloning, Editing and Adding Deep Learning Models
StarDist Models
If you fail to find the expected number of objects when making a StarDist prediction, there are several adjustments that can be made to improve the prediction.
Object Diameter
The mean diameter of the objects against which a StarDist model was trained is set as the default Object Diameter. If the diameter of your objects of interest differ from this value they will not be predicted accurately.
You can correct this by deselecting the Default check box, and entering the diameter of your objects of interest in the Object Diameter field. If your image is calibrated, the diameter is shown in calibrated units, the diameter is shown in pixels for uncalibrated images.
Select the Size Guide Display Visible check box to display a graphical representation of Object Diameter on the active image.
You can change the Object Diameter setting by clicking on the size guide and dragging the control points. You can also use the control points to move the guide around the active image, or to the side of the active image.
Figure illustrating the StarDist Object Diameter size guide.
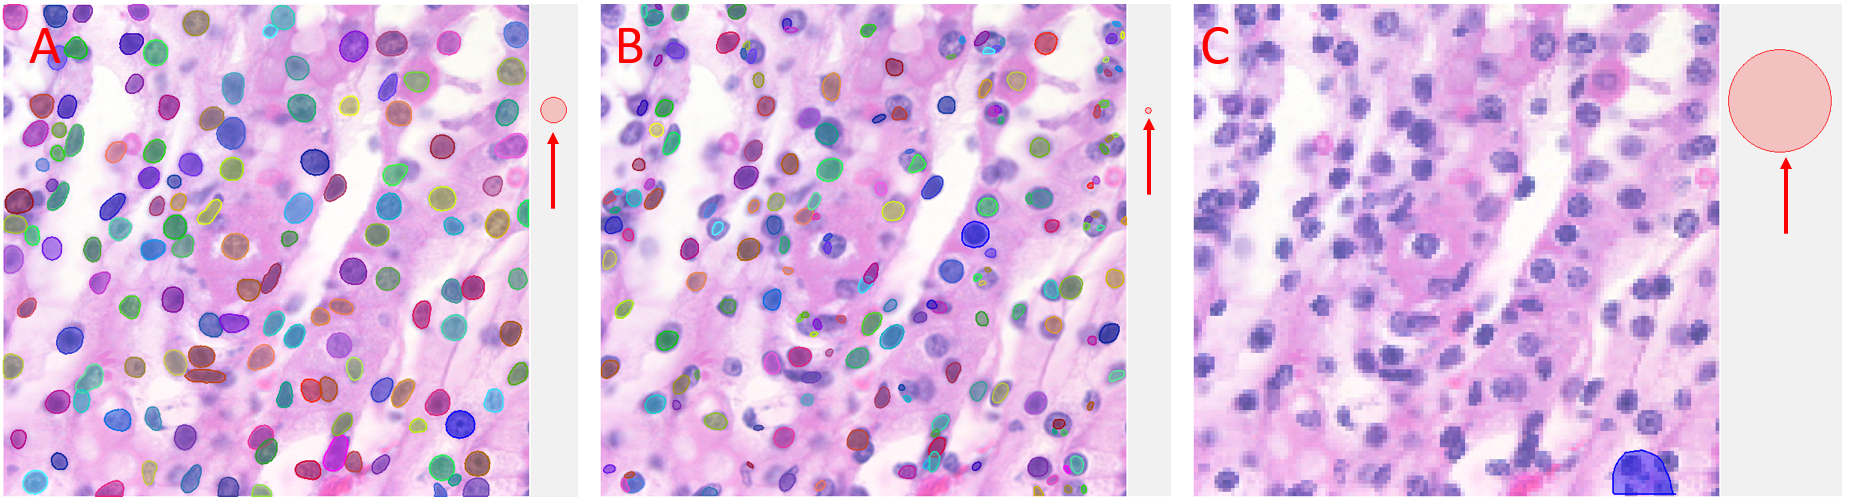
Figure illustrating the effect of Object Diameter on StarDist Prediction. A) Accurate Prediction of objects when the object diameter matches the default size of the model (size guide arrowed). B) Inaccurate prediction made when the default object diameter is smaller than the objects of interest (size guide arrowed). Increase the Object Diameter to improve prediction. C) Inaccurate prediction made when the default object size is larger than the objects of interest (size guide arrowed). Decrease the object diameter to improve accuracy.
Threshold (%)
Decreasing the Threshold(%) setting increases the number of predicted objects (and also increases the probability of generating false positives), increasing the Threshold(%) setting decreases the number of predicted objects (and reduces the probability of generating false positives).
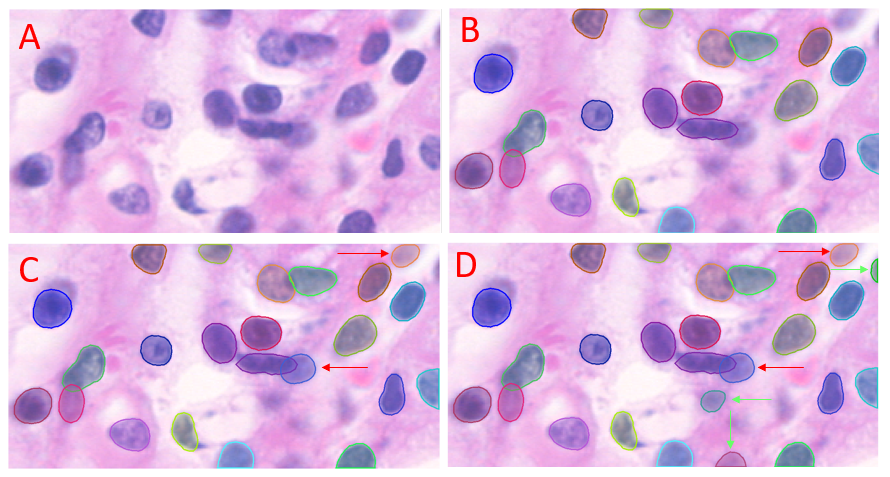
Figure illustrating the affect of the Threshold% setting on StarDist prediction. A) Unlabeled. B) StarDist prediction with Threshold% set to 69.2 (default). C) StarDist prediction with Threshold% reduced to 50. Two additional objects (relative to B) are predicted (red arrows). D) StarDist prediction with Threshold% reduced to 20. Three additional objects (relative to C) are predicted (green arrows).
Max Overlap (%)
If your objects of interest overlap or intersect, you can adjust the degree of permitted overlap between valid objects with the Max Overlap(%) setting. Increase this value to allow an increasing degree of overlap, reduce it to allow a decreasing degree of overlap.
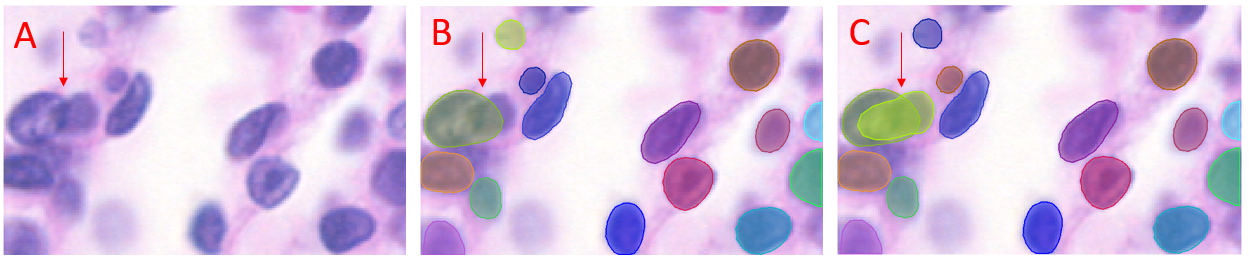
Figure illustrating the effect of the Max Overlap(%) setting on StarDist prediction. A) Unlabeled. A pair of overlapping objects are arrowed. B) StarDist prediction with Max Overlap(%) set to 30 (default). Only one of the overlapping objects is predicted (arrow). C) StarDist prediction with Max Overlap(%) set to 72. Both of the overlapping objects are predicted with this setting (arrow).
Allow Overlap
With this setting enabled overlapping objects are drawn in full, with some pixels included in more than one object. With the setting disabled overlapping objects are truncated, pixels can only be included in a single object.
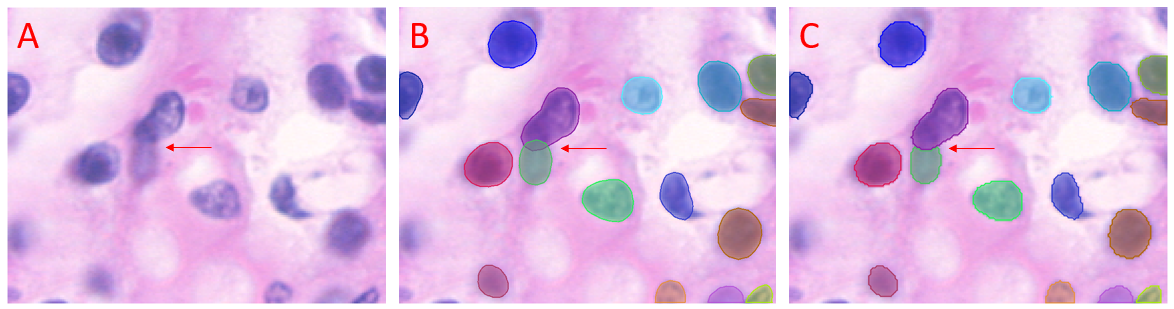
Figure illustrating the effect of the Allow Overlap setting. A) Unlabeled field with overlapping objects arrowed. B) StarDist prediction with Allow Overlap enabled. The overlapping objects (arrowed) are drawn in full, with some pixels included in both overlapping objects. C) StarDist prediction with Allow Overlap disabled. One of the overlapping objects (arrowed) is drawn in full, with the second truncated.
What if you still can't segment your objects of interest?
If your objects of interest are not predicted after adjustment of all of the available parameters, you should attempt to train a new model, or extend a model by training with your objects of interest. Image-Pro AI models are locked and can not be trained, so must be cloned before they can be extended with further training.
Cloning, Editing and Adding Deep Learning Models
UNET Models
UNET models do not have settings that you can adjust.
If you fail to segment your images correctly with a UNET model, you can try:
-
Loading another more suitable model.
-
Refining your model with further training. Click Continue Training to open the model in the AI Deep Learning Training Panel.
-
Cloning the model and further training the cloned model. Click Clone Model to open the Clone Model dialog.
-
Make and train a new model.
What if you still can't segment your objects of interest?
If your objects of interest are not predicted after adjustment of all of the available parameters, you should attempt to train a new model, or extend a model by training with your objects of interest. Image-Pro AI models are locked and can not be trained, so must be cloned before they can be extended with further training.
Cloning, Editing and Adding Deep Learning Models
Learn more about all features in Count/Size